
19 August 2026 · 8 min read
How to Learn King Pigeon Pose: 5 Easy Yoga Practices for Flexibility, Mobility & Strength
By pure Lifestyle Yoga
How to Learn King Pigeon Pose: 5 Easy Yoga Practices for Flexibility, Mobility & Strength
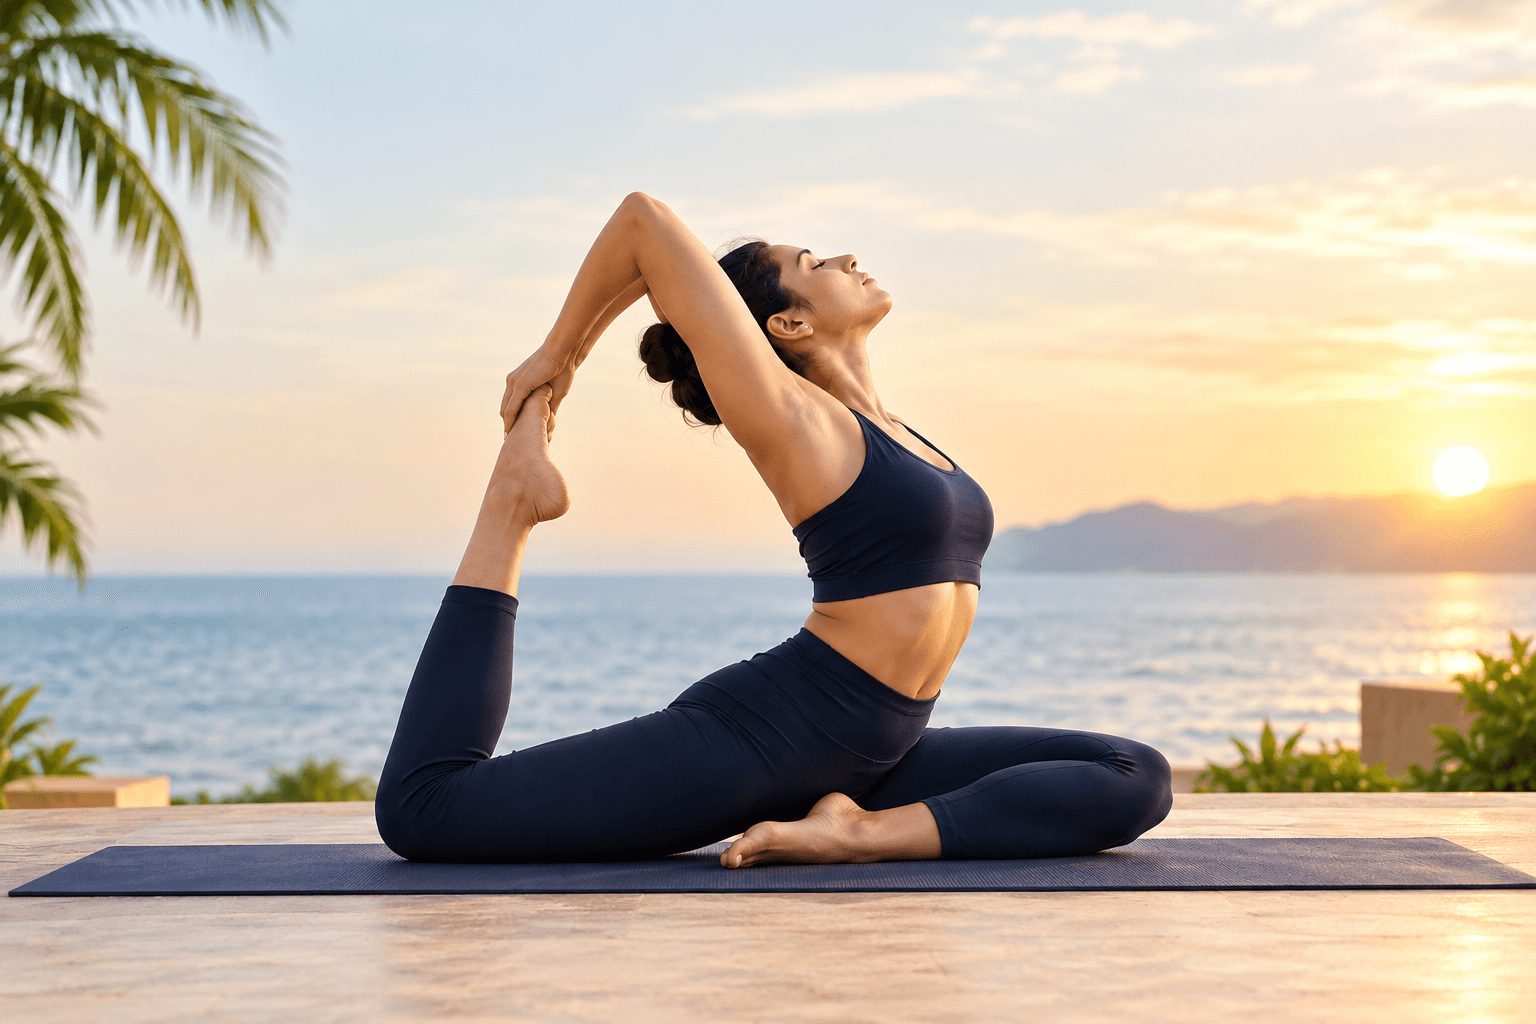
King Pigeon Pose, also known as Eka Pada Rajakapotasana, is an advanced yoga posture that combines hip opening, back flexibility, balance, mobility, and body awareness. Although the complete posture may look challenging, you do not need to force your body into the final position.
The key to learning King Pigeon Pose is progressive practice. By preparing the hips, hip flexors, quadriceps, shoulders, and spine through simpler yoga practices, you can gradually develop the flexibility and control required for the pose.
Whether you are a yoga practitioner looking to improve your mobility or someone working toward deeper backbends and hip-opening postures, these five practices can help you build a safer and more confident foundation.
Important: King Pigeon Pose is a demanding posture. It should be approached gradually, with proper warm-up and attention to alignment. Never force the knees, hips, or lower back into a deeper position.
What Is King Pigeon Pose?
King Pigeon Pose, or Eka Pada Rajakapotasana, is a deep hip-opening and backbending posture.
In the posture, one leg is positioned forward while the opposite leg extends behind the body. As the practitioner progresses, the back knee bends and the foot is brought toward the head, with the arms reaching overhead to hold the foot.
This combination requires mobility in several areas of the body, including:
- Hips and hip flexors
- Quadriceps
- Glutes and outer hips
- Shoulders
- Chest
- Spine
Because the pose requires both mobility and stability, developing the posture gradually is more beneficial than trying to achieve the final shape immediately.
5 Easy Yoga Practices to Prepare for King Pigeon Pose
1. Low Lunge – Open the Hip Flexors
Low Lunge (Anjaneyasana) is an excellent preparation for King Pigeon because the back leg position creates a gentle stretch through the hip flexors.
How to Practice
- Begin in a tabletop position.
- Step your right foot forward between your hands.
- Lower your left knee onto the mat.
- Keep your chest lifted and gently move your hips forward.
- Avoid forcing the stretch.
- Take several slow, comfortable breaths.
- Repeat on the opposite side.
Why It Helps
The back leg in King Pigeon requires significant hip extension. Practicing Low Lunge regularly can help prepare the front of the hip and improve mobility gradually.
Tip: Keep your core lightly engaged and avoid sinking aggressively into the stretch.
2. Classic Pigeon Pose – Build Hip Mobility
Before attempting the full King Pigeon, it is important to become comfortable with the basic Pigeon Pose.
This variation focuses primarily on opening the hips and preparing the body for the more demanding version.
How to Practice
- Start from Downward-Facing Dog.
- Bring your right knee forward toward your right hand.
- Extend your left leg behind you.
- Keep the front foot comfortable rather than forcing the shin into a particular angle.
- Try to keep your pelvis relatively balanced.
- Place a folded blanket under the hip if you cannot comfortably reach the floor.
- Stay for several slow breaths.
- Repeat on the other side.
Pigeon Pose can stretch the outer hip, thighs, groin, hip flexors and surrounding muscles, making it a useful preparation for more advanced hip-opening postures.
Remember: Your front shin does not need to be perfectly parallel to the front edge of your mat. Your body's comfortable range of motion should determine the position.
3. Quad Stretch – Prepare the Back Leg
One of the biggest challenges in King Pigeon is the deep stretch required through the quadriceps of the back leg.
A gentle quad stretch can help you gradually prepare for this movement.
How to Practice
You can begin with a simple standing quad stretch:
- Stand tall with your feet hip-width apart.
- Bend one knee and bring your heel toward your glutes.
- Hold your ankle with the same-side hand.
- Keep your knees relatively close together.
- Gently move your thigh backward without arching your lower back excessively.
- Hold for a few comfortable breaths.
- Switch sides.
As your flexibility improves, you can explore deeper variations under the guidance of a qualified yoga teacher.
The full King Pigeon requires considerably more quadriceps and back flexibility than the basic Pigeon Pose, so gradual preparation is important.
4. Cobra or Gentle Backbend – Open the Chest & Spine
King Pigeon is not only a hip-opening posture. The final variation also involves a significant backbend.
Gentle backbends can help you become more comfortable with extending the spine while keeping the movement controlled.
How to Practice
- Lie on your stomach.
- Place your hands beside your chest.
- Press gently into the mat.
- Lift your chest without forcing the movement.
- Keep your shoulders relaxed away from your ears.
- Maintain comfortable breathing.
- Slowly return to the floor.
The objective is not to bend as deeply as possible. Instead, focus on creating length through the spine and opening the chest.
A controlled approach is particularly important because advanced King Pigeon requires coordination between the hips, spine, shoulders, and legs.
5. King Pigeon Preparation With a Yoga Strap
A yoga strap can be extremely helpful when learning the final movement.
Instead of forcing your hand to reach the back foot, the strap allows you to work on the shoulder, quadriceps, and backbend components progressively.
How to Practice
- Come into a comfortable Pigeon Pose.
- Bend the back knee.
- Place a yoga strap around the back foot.
- Hold the strap with the opposite hand.
- Slowly bring the arm upward and backward.
- Keep your chest lifted.
- Maintain a steady breath.
- Only move deeper if the position remains comfortable.
- Release slowly and repeat on the other side.
Using a strap allows you to explore the movement without sacrificing alignment simply to reach the foot. Props such as straps, blankets and blocks can make the progression more accessible.
How to Progress Into King Pigeon Pose
Once your body becomes comfortable with the preparatory practices, you can gradually explore the complete posture.
A basic progression can look like this:
Low Lunge → Pigeon Pose → Quad Stretch → Gentle Backbend → Strap-Assisted King Pigeon → Full King Pigeon
You don't have to complete every stage in one session.
Yoga is not about forcing the body into a particular shape. The goal is to develop mobility, strength, control and awareness over time.
Common Mistakes to Avoid
1. Forcing the Front Knee
One of the most important principles in Pigeon Pose is respecting the range of motion of your front hip.
If you feel sharp or uncomfortable pressure around the knee, come out of the posture and modify it.
2. Trying to Grab the Foot Too Soon
Being able to touch your back foot is not the goal.
If your hand cannot reach the foot comfortably, use a yoga strap instead.
3. Collapsing Into the Lower Back
In the deeper variation, avoid simply pushing the abdomen forward and compressing the lower back.
Think about lengthening the spine first, then gradually creating the backbend.
4. Ignoring Hip Alignment
Try to keep your pelvis stable rather than allowing the body to dramatically shift to one side.
A blanket or yoga block underneath the front hip can provide additional support when needed.
5. Comparing Your Flexibility With Others
Yoga is a personal practice.
Your body may require weeks or months of preparation before the full posture becomes accessible—and that is completely normal.
Benefits of Practicing Toward King Pigeon Pose
With appropriate preparation and technique, King Pigeon progressions can help develop:
Improved Hip Mobility
The posture works through different aspects of hip movement and can be a valuable part of a mobility-focused yoga practice.
Greater Lower-Body Flexibility
The front and back legs experience different stretches, involving areas such as the quadriceps, hip flexors, outer hips and glutes.
Better Shoulder & Chest Mobility
The overhead arm position in the deeper variation requires mobility in the shoulders and chest.
Improved Body Awareness
Because King Pigeon requires coordination between several parts of the body, practicing it slowly can encourage greater awareness of alignment, breathing and movement.
Increased Confidence
Progressing from simple variations to more challenging postures can help develop patience and confidence in your yoga practice.
Who Should Be Careful With King Pigeon Pose?
King Pigeon is an advanced posture and is not suitable to force through pain.
If you have a history of knee, hip, spinal or shoulder problems, it is advisable to consult an appropriately qualified healthcare professional and/or experienced yoga teacher before attempting the deeper variation.
During practice:
- Never force the front knee.
- Avoid bouncing or sudden movements.
- Use props when necessary.
- Keep breathing smoothly.
- Stop if you experience sharp pain.
- Learn the progression under qualified instruction if you are new to advanced yoga postures.
Yoga Journal also emphasizes that Eka Pada Rajakapotasana requires careful preparation and precise alignment, particularly because of the demands placed on the hips and spine.
How Long Does It Take to Learn King Pigeon Pose?
There is no fixed timeline.
Your progress depends on factors such as:
- Current flexibility
- Hip mobility
- Shoulder mobility
- Previous yoga experience
- Strength and stability
- Consistency of practice
- Individual anatomy
Instead of asking, “How quickly can I do King Pigeon?”, ask:
“Can I practice the posture with better control, alignment and comfort than I could before?”
That shift in mindset can make your yoga practice more sustainable and enjoyable.
Final Thoughts
King Pigeon Pose is more than an impressive yoga posture. It is a practice in patience, mobility, strength and body awareness.
You don't need to achieve the full pose on your first attempt. Start with simple hip-opening movements, gradually work on your quadriceps and shoulders, strengthen your foundation, and use props whenever necessary.
With consistent practice and proper guidance, you can gradually build the mobility and confidence required to explore Eka Pada Rajakapotasana safely.
Progress one step at a time—and let your practice develop naturally.
Ready to deepen your yoga practice?
At Pure Lifestyle Yoga, we believe that yoga is a journey rather than a destination. Whether you are beginning your yoga journey or working toward advanced postures, consistent practice, proper guidance and mindful movement can help you progress with confidence.
Keep practicing. Keep breathing. Keep progressing.
Enjoy writing like this?
Considered pieces on practice and wellbeing — never a marketing blast.